If you're new to growing plants at home or simply want to try a new technique, here are some seed-starting tips that can help you get off to a great start for your spring or fall garden! Growing plants from seed is not as complicated as it may seem. By following a few simple steps, you can succeed. With a few exceptions, like lettuce, all seeds need to germinate are moisture and warmth. For those looking to get a headstart on their spring garden, the "warmth" part typically means starting plants indoors and letting them grow to the appropriate size before transplanting them to your GreenStalk outside.
Seed Selection
First, of course, you need to know what you want to grow! Starting from seed gives you a big advantage in terms of diversity compared to buying starter plants at your local nursery. When purchasing plants from a store, you'll usually find only the standard varieties—those that do well in most parts of the country. Over the last few decades, a few heirloom varieties have also made their way into the mix. However, to explore a large variety of plants, especially heirlooms (which continue to be introduced each year), look to seed catalogs. There are numerous seed companies that have an online catalog.
If you prefer to thumb through a paper version, most companies will mail you a copy on request. Your local nursery can't match the number of varieties available in these catalogs. For example, in just three catalogs we viewed, there were 13 varieties of turnips, 23 varieties of summer squash, and tomato varieties that spanned multiple pages. This trend holds true for virtually every vegetable.

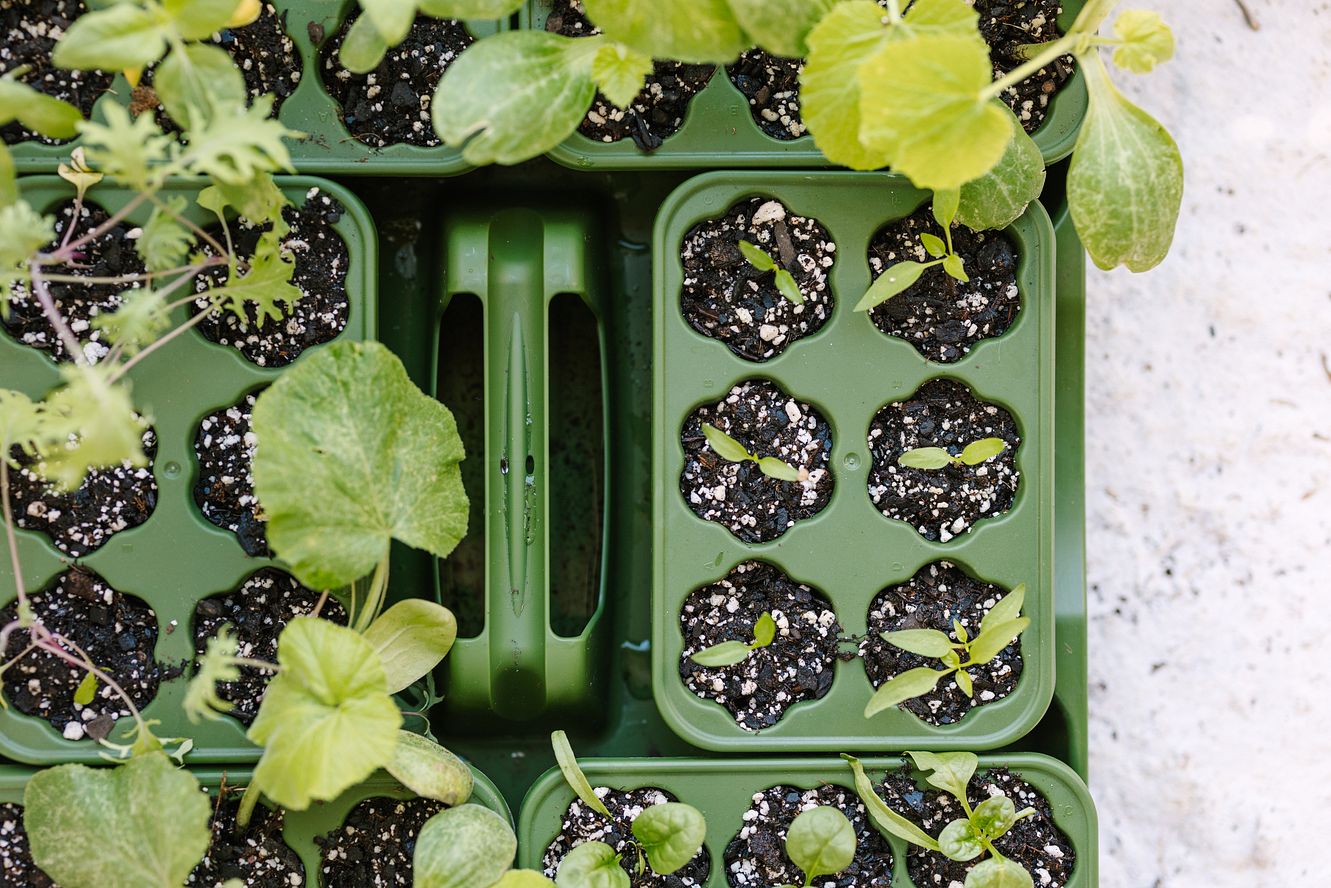
The GreenStalk Seed Starter Kit is the perfect tool for starting seeds before transplanting into your Vertical Planter.
If you're unsure whether to start seeds indoors or sow directly into the pocket, here's our recommended list:
Direct Sow: Start Indoors:
- Arugula
- Beet
- Bok Choy
- Bush Beans
- Cantaloupe*
- Carrot
- Cilantro
- Corn
- Cucumber
- Dill
- Fennel
- Lemon Balm
- Lettuce
- Mint
- Onion
- Parsley
- Parsnips
- Pea
- Okra*
- Radish
- Spinach
- Squash*
- Swiss Chard
- Turnips
- Watermelon*
- Zucchini*
- Basil
- Broccoli
- Cabbage
- Cauliflower
- Eggplant
- Fennel
- Kale
- Lavender
- Leek
- Lemon Balm
- Mint
- Onion
- Oregano
- Pepper
- Rosemary
- Sage
- Thyme
- Tomato
Planting
We love using the GreenStalk Seed Starter Kit! We created this kit to be durable and reusable to last for seasons to come. The Seed Starter Kit comes in three parts; six Seed Starters, the Carrier, and a heavy-duty Water Tray. All three components nest together perfectly so you have everything you need to start your seeds in one durable, compact unit!
Each Seed Starter contains six cells, allowing you to plant 36 seeds at once! The cells are labeled A-F to help you track which seeds are planted where. The Seed Starters fit securely into the Carrier, which features a convenient handle for easy lifting. Holes in the Carrier allow water to pass up from the Water Tray, ensuring that each cell is adequately moistened. As an added bonus, the Carrier doubles as a tray you can use when harvesting from your GreenStalk. Check out this video for more information on the Seed Starter Kit!
For planting, always use a high-quality potting soil or seed-starting mix. We recommend Happy Frog potting soil for its light, fluffy texture. Do not use garden soil or topsoil! Make sure the soil is moist when filling the cells.

Mist the soil after planting your seeds.
When it’s time to add the seeds, refer to the instructions on the packet. It will provide information on planting depth and how long it will take for the seeds to sprout. For example, bell peppers require a planting depth of 1/4 inch, while dill seeds can be simply pressed into the soil surface. A plastic spoon or toothpick can help with placement. Always plant at least 2-4 seeds per cell to ensure proper germination. Always plant at least 2-4 seeds per cell to ensure proper germination. After planting, moisten the soil gently. Be careful not to disturb the seeds, especially tiny ones planted at a shallow depth, as they can dry out and fail to germinate. We recommend using a simple hand sprayer to mist the soil gently.
After planting, place the Seed Starter Kit in a warm area indoors. Depending on your geographic location, you may want to use a heat mat to prevent the seeds from getting too cold, which can hinder germination. Some seeds, like lettuce, dill and oregano, need light to sprout. For these, place the Seed Starter Kit in a spot that gets sunlight during the day or use a grow light. Your local hydroponics store can offer advice on the right type of grow lights.
Also, keep in mind the first and last frost dates in your area. Seed packets will typically recommend planting seeds indoors a certain number of weeks before the last frost date. For instance, a packet of chive seeds may suggest planting the seed 6-8 weeks before your average last frost date. Remember that the last frost date is only an average, so always check the weather before transplanting seedlings outdoors.

The Carrier and Water Tray work together to ensure each cell receives adequate moisture.
Seedlings
Once your seeds have sprouted, it’s time to care for your seedlings. Using the GreenStalk Seed Starter Kit, you can water the cells by adding water to the tray. For the first week or two after the seedlings sprout, you may want to continue misting the tops of the cells with your hand sprayer to keep the top layer of soil moist until the seedlings develop a strong root system. The first leaves that appear when your seedlings sprout are cotyledons and are not true leaves; they are part of the embryonic structure that provides early nutrition to the plant. The next leaves to develop are the true leaves and are a smaller version of those you will see on the adult plant. Seedlings typically don’t need fertilizer right away as the cotyledons are providing nutrients to the plant until the true leaves take over photosynthesis. Once photosynthesis begins, there should be sufficient nutrients in the soil to support the plant. However, if you feel it’s needed, you can give them a mild fertilizer solution once they have at least 1-2 sets of true leaves.
Now comes the necessity of thinning the seedlings. Choose the healthiest plant in each cell and remove the others. Thinning by pulling up the extra seedlings is not recommended as their roots may be intertwined and you might pull up or damage the remaining plant. Instead, use micro shears to remove the plants or pinch off the extra seedlings.
Once your seedlings have 3-4 sets of true leaves, it’s time to harden them off. Hardening off helps them adjust to outdoor conditions. Gradually expose them to outdoor temperatures and sunlight over 7-10 days. Be cautious of temperature drops, and avoid putting seedlings outside on particularly cold days. Also, protect the seedlings from strong or chilly winds, which can damage them.

After transplanting, consider using the GreenStalk Seed House to retain moisture and warmth.
To the Great Outdoors!
After the danger of frost has passed and your seedlings have been sufficiently hardened off, you can transplant them into your GreenStalk! Follow planting instructions that come with your planter or email support@greenstalkgarden.com for guidance. In early spring or fall, continue to monitor the weather for unexpected frosts or temperature drops. In the event there should be an unexpected cold spell, consider moving your GreenStalk to a sheltered area, such as a garage, or place it against a wall. You can also use a Frost Protection Cover, which can provide about 8 degrees of extra protection during brief periods of cold.
For additional protection, consider the GreenStalk Seed House. Available in a set of six, each Seed House is a clear cover designed to fit either the Original or Leaf Planters. The Seed House clips onto the individual planting pocket, helping protect the seedling while retaining moisture and warmth. It will also shield seedlings from chilly winds. The Seed House attaches to your planter in seconds and can be easily removed when the plant has grown sufficiently so that it is no longer needed. Like all GreenStalk products, it is built to last and can be used season after season.
A successful growing season begins with healthy plants. We hope these tips help you get off to a great start!
Happy gardening!


